How to renew Japanese visa online with a Mac
This was one of the most annoying things I had to do in a while.
To be honest, I think going in person may be easier.
This is a quick write-up of how I did it, in case it helps someone else.
WARNING
JPKI app does not work on macOS for visa renewal! A Windows VM is required!
Table of contents
- Preparations
- Troubleshooting
- References
Preparations
My Number card
Go to My Number Card online application and apply for a My Number card if you do not have one. You need the physical card with a chip and photo, not just the paper one.
Get a compatible IC card reader
Ask a friend or buy one from Amazon.
Full list of IC card readers and writers compatible with My Number cards
TIP
If you have an Android phone, you can use it as an IC card reader by installing the JPKI利用者ソフト app.
Prepare Windows virtual machine (VM)
I tried using it directly on a Mac, but the JPKI app did not work on macOS.
Prepare your Mac for Windows VM:
- Make sure your Mac has enough disk space and RAM to run the VM.
- At least 30 GB of disk space and 8 GB of RAM are required.
- MacBook Pro is recommended, but MacBook Air can also work if you close all other apps and run an external fan to keep it cool.
- Windows VM will crash if you do not have enough disk space or RAM.
UTM or Parallels Desktop?
- I tried both UTM and Parallels Desktop, and both worked.
- Parallels Desktop was slightly easier to set up but not worth the $100 fee.
- UTM is free and open source, only a bit more complicated to set up.
- UTM took me 3 hours to set up without prior knowledge, while Parallels Desktop took me 2 hours.
- Sadly, I do not get paid $100 per hour for my time. 😅
CAUTION
Make sure your Mac has enough RAM (8+ GB) and disk space (30+ GB) to run the VM or it will crash!
Method 1: UTM - free and open source
What is UTM?
- UTM is free and open source virtualization software that allows you to run virtual machines (VM) on your Mac.
- It is based on QEMU and provides a user-friendly interface to create and manage VMs.
- Watch this YouTube video tutorial first, and then it is straightforward to set up.
Overview of steps to install Windows 11 on UTM:
- Install UTM to run a Windows VM on your Mac.
- Option 1: Download from the official website - completely free and open source.
- Option 2: Buy it on the Mac App Store for $9.99 to support the developers.
- App Store version is easier to update & manage but you can just download the free version from the official Microsoft website.
- Download the Windows 11 ISO file - either using CrystalFetch or directly from Microsoft.
- I used CrystalFetch from the Mac App Store to download the latest Windows 11 ISO.
- I downloaded the Windows 11 Home edition ISO in English but later needed to change the language settings to Japanese.
- Create a new VM in UTM and attach the Windows 11 ISO file.
- Open UTM and click "+" to create a new VM.
- Select "Virtualize" and then "Windows".
- Choose the downloaded Windows 11 ISO file as the boot disk.
- Allocate at least 8 GB of RAM and 30 GB of disk space for the VM.
- 8000 MiB is 8.39 GB
- Click "Create" to finish the VM setup.
- Start the VM and follow the Windows installation wizard.
- Hit "Enter" immediately after starting the VM to boot from the ISO file.
- Follow the on-screen instructions to install Windows 11.
Read the official UTM documentation to install Windows 11 for detailed instructions.
Method 2: Parallels Desktop - paid but easier
Install Parallels Desktop to run a Windows VM on your Mac.
- Every Mac gets a 14-day free trial.
- After it expires, you need to purchase a subscription (about $100 or wait for a discount).
Install Windows 11 on Parallels Desktop:
- Make sure you have a stable internet connection.
- Keep your Mac plugged in and awake during installation.
Windows 11 license key is not required
For just visa renewal, you do not need a Windows 11 license key. The trial version is sufficient.
Optional: set up Windows without a Microsoft account
I did not want to use a Microsoft account, so I opened the command prompt and ran the following command to bypass the Microsoft account login during Windows setup:
- To open the command prompt, press
fn+SHIFT+F10during the Windows setup. - Run the following command in the command prompt:
start ms-cxh:localonly
Change language and region settings to Japanese
TIP
For those who already have a Windows computer, you can start from here. ✍️
As you can image, this is Japanese government made software - not only do you need to run it on Windows, but you also need to change the language and region settings to Japanese for it to work properly.
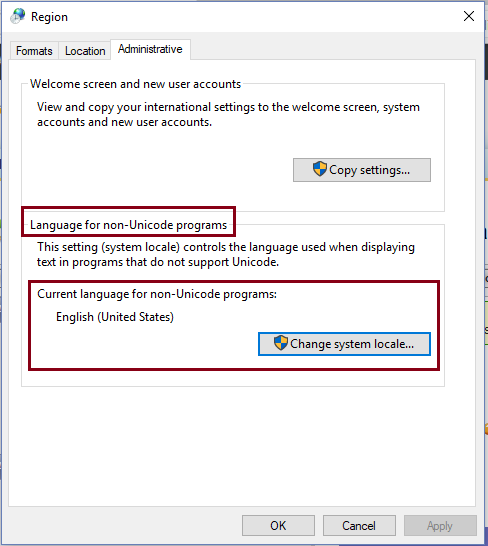
Change the
Language for non-Unicode programsWindows settings to Japanese.- Go to
Control Panel>Region>Administrativetab. - Click
Change system locale...and selectJapanese (Japan). - Apply the changes and restart your computer.
- Go to
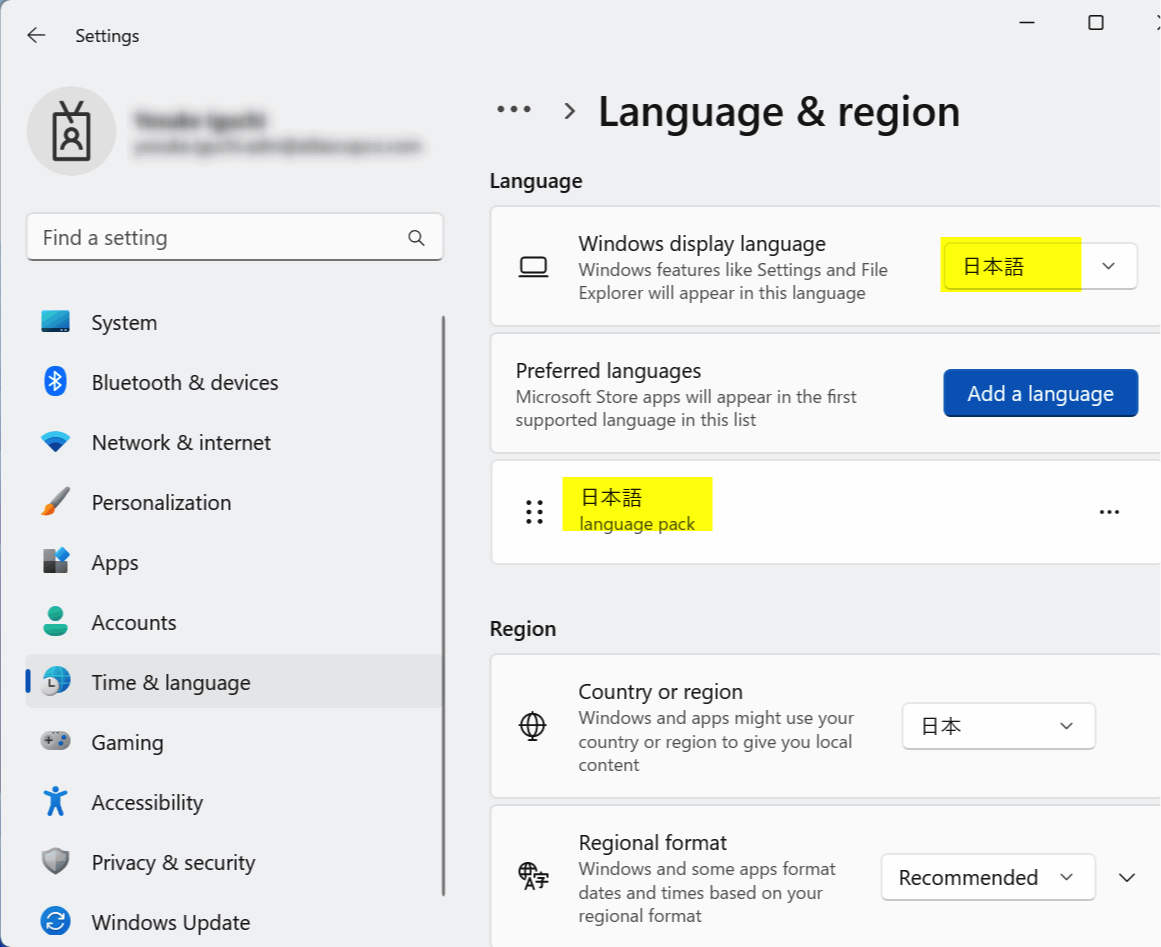
Change language and region settings to Japanese.
- Go to
Settings>Time & Language>Language>Preferred languages. - Click on
Add a languageand selectJapanese. - Install the Japanese language pack.
- Set it as the primary display language.
- Apply the changes and restart your computer.
- Go to
Watch this video tutorial
Before continuing, watch this video tutorial before continuing:
The video is in Chinese, I highly recommend watching this video tutorial as it is the best walkthrough showing how to set up the JPKI app on Windows for visa renewal.
Install JPKI app and Java on Windows
After configuring Windows to Japanese settings, install:
- JPKI app (JPKI利用者ソフト)
- latest JAVA update (Java8 Update 371)
- Download directly, not via package manager.
- "JRE" or "Java Runtime Environment" is just Java.
- 利用者クライアントソフト Edge/Chrome - Chrome ウェブストア
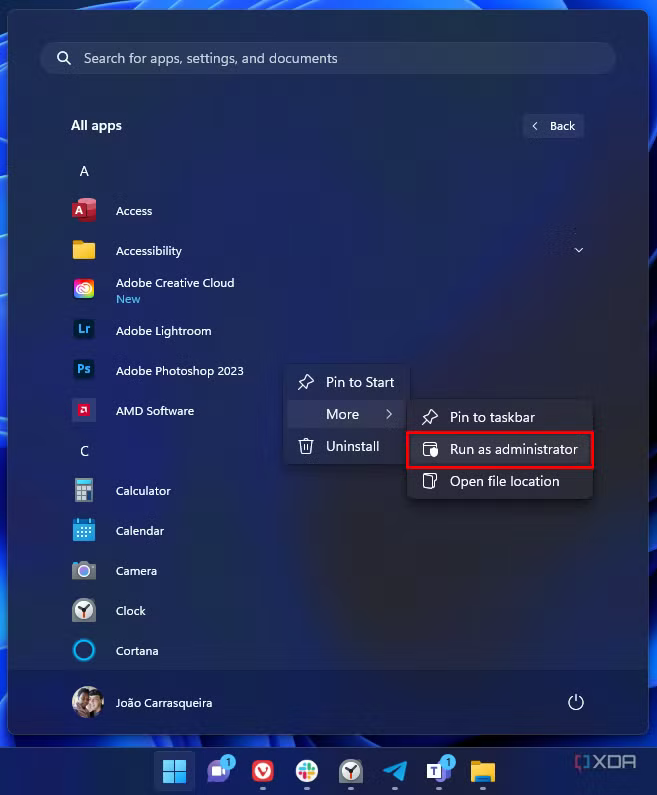
Run the apps as administrator and allow them to run in the background.
- Right-click the app's shortcut or executable and select "Run as administrator" from the context menu
WARNING
Install Java first, then the JPKI app. Order matters.
Verify JPKI app installation
Open the JPKI app (JPKI利用者ソフト) and make sure it runs without errors.
TIP
Save and snapshot the VM after installation. Also restart the VM after installing the JPKI app and Java.
Online visa renewal
After installing the JPKI app and Java, you can now proceed to the online visa renewal process.
- Open the Immigration Services Agency's Online Residence Application Procedures webpage.
- Click the big green button labeled
在留申請オンラインシステムのご利用はこちらから。(在留申請オンラインシステムのトップページへリンクします。)https://www.ras-immi.moj.go.jp/WC01/WCAAS010/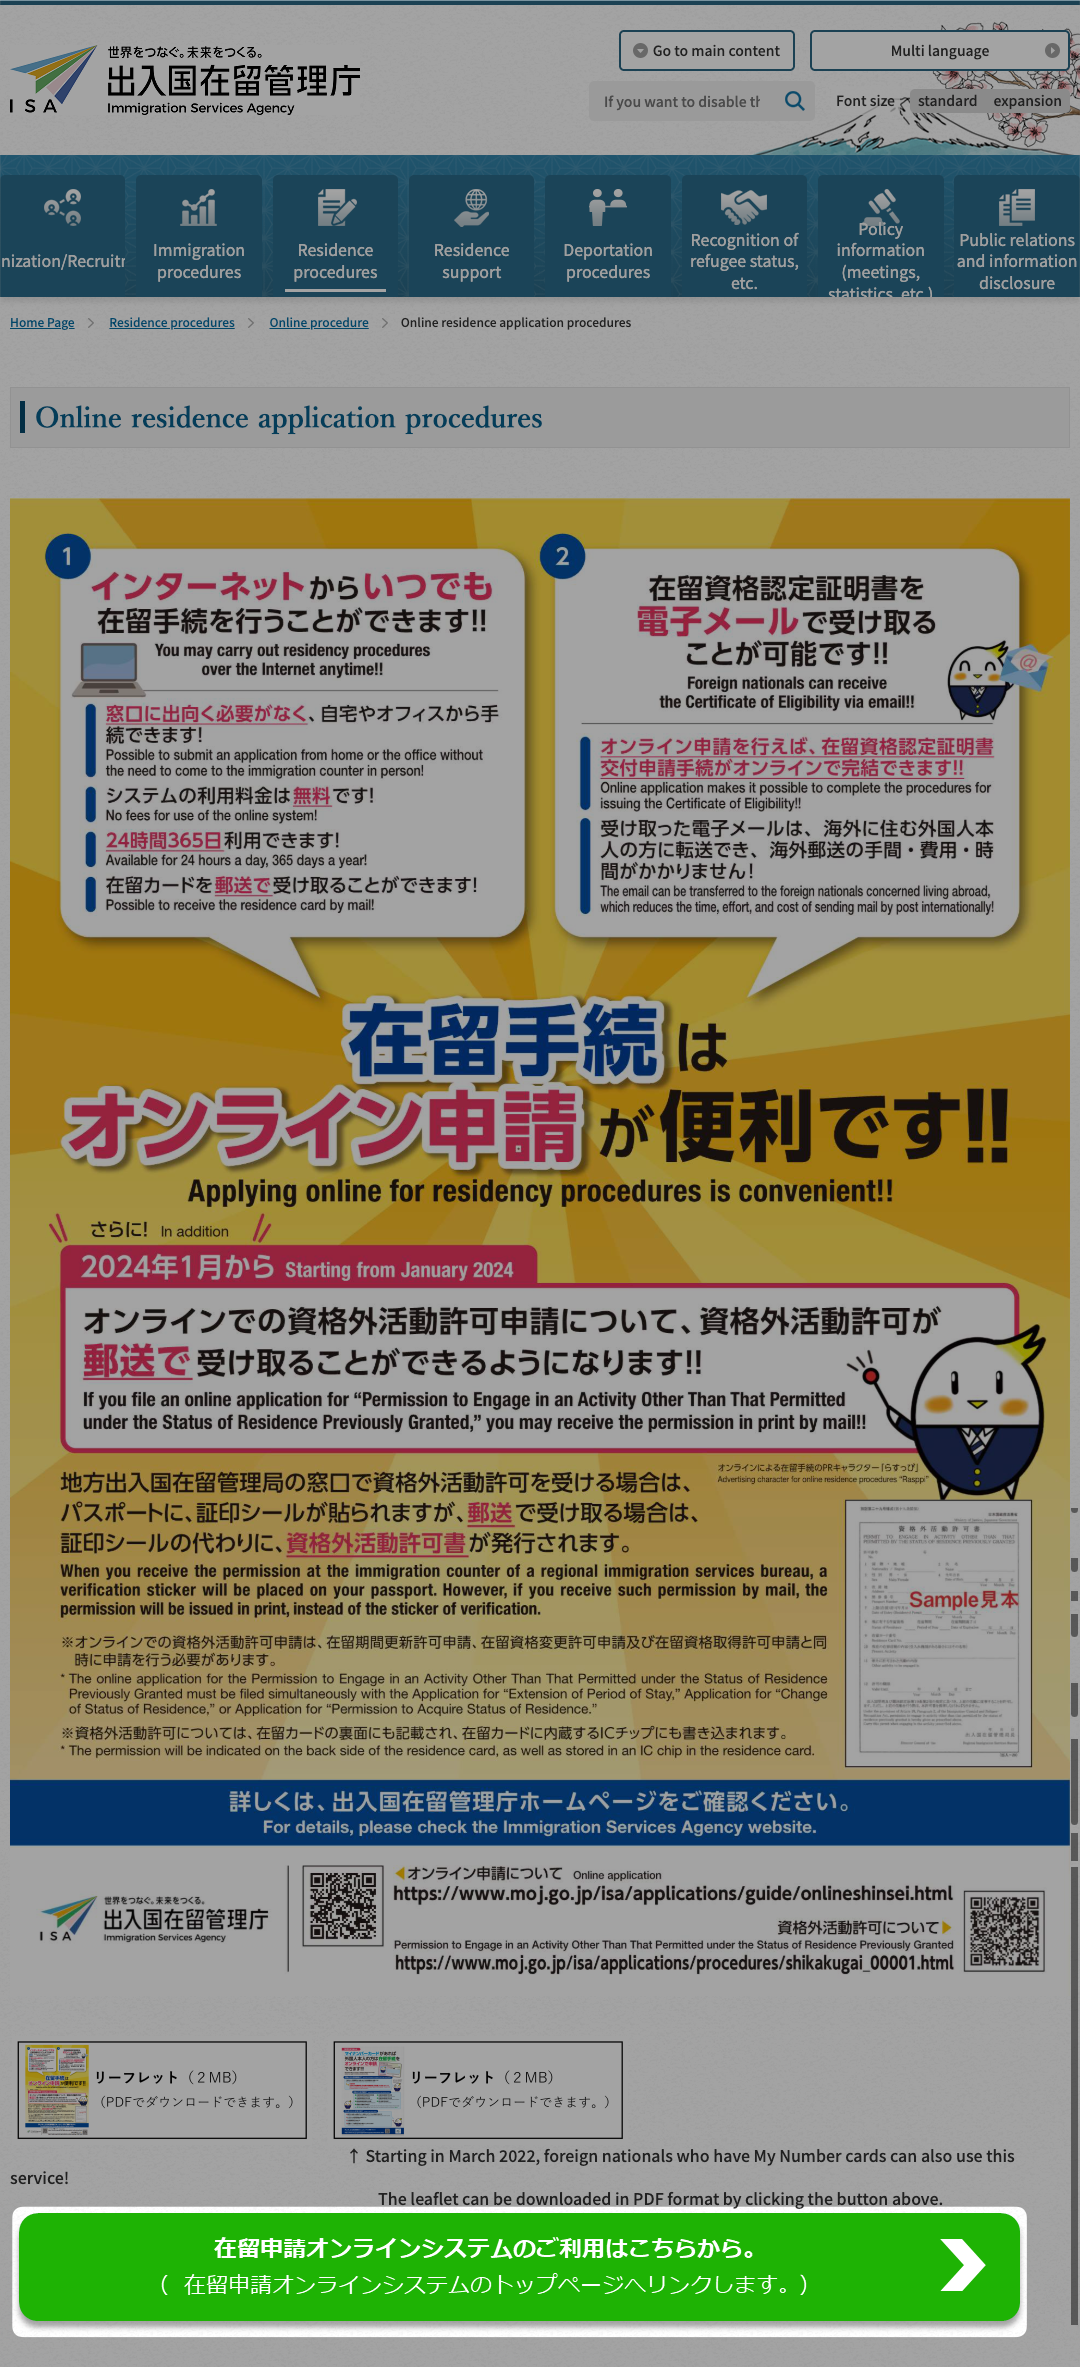
Troubleshooting
Here are some issues I encountered while trying to setup the Windows VM, install and use the JPKI app, and how to fix them.
Windows VM issues
Issue: Black screen
UEFI Iterative Shell v2.2appears instead of Windows installer.- Context: When starting the Windows VM for the first time, instead of the Windows installation wizard, you see a black screen with
UEFI Iterative Shell v2.2. - Cause: You missed hitting
Enterto boot from the attached Windows Boot ISO image file. Thus, you are seeing the VM's shell instead of the Windows installer. - Solution: Restart the Windows VM and hit
Enterimmediately after the VM starts. 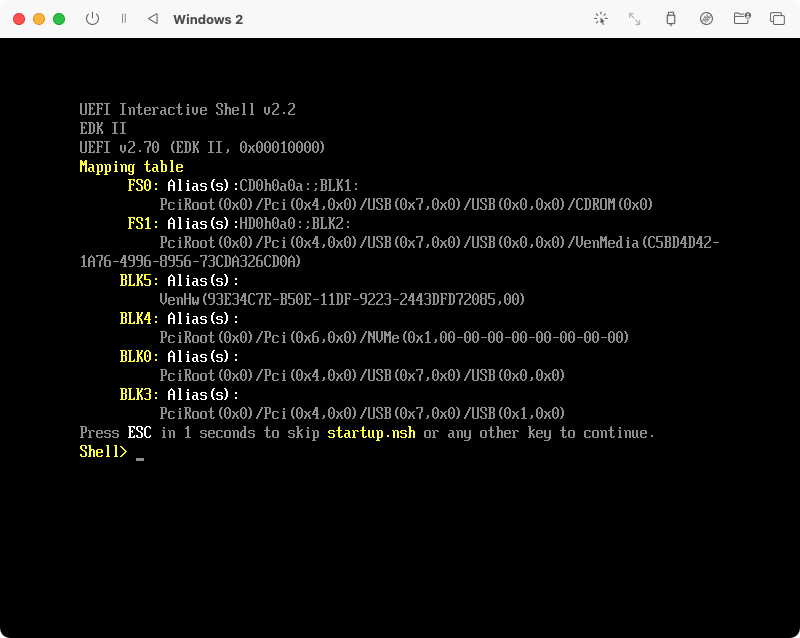
- Context: When starting the Windows VM for the first time, instead of the Windows installation wizard, you see a black screen with
Issue: VM crashes or freezes.
- Cause: Not enough disk space or RAM.
- Solution: Allocate 30 GB disk space and 8 GB RAM.
Broken error message when running JPKI利用者ソフト
Issue: When trying to run the JPKI installer, you may encounter a broken error message like this:
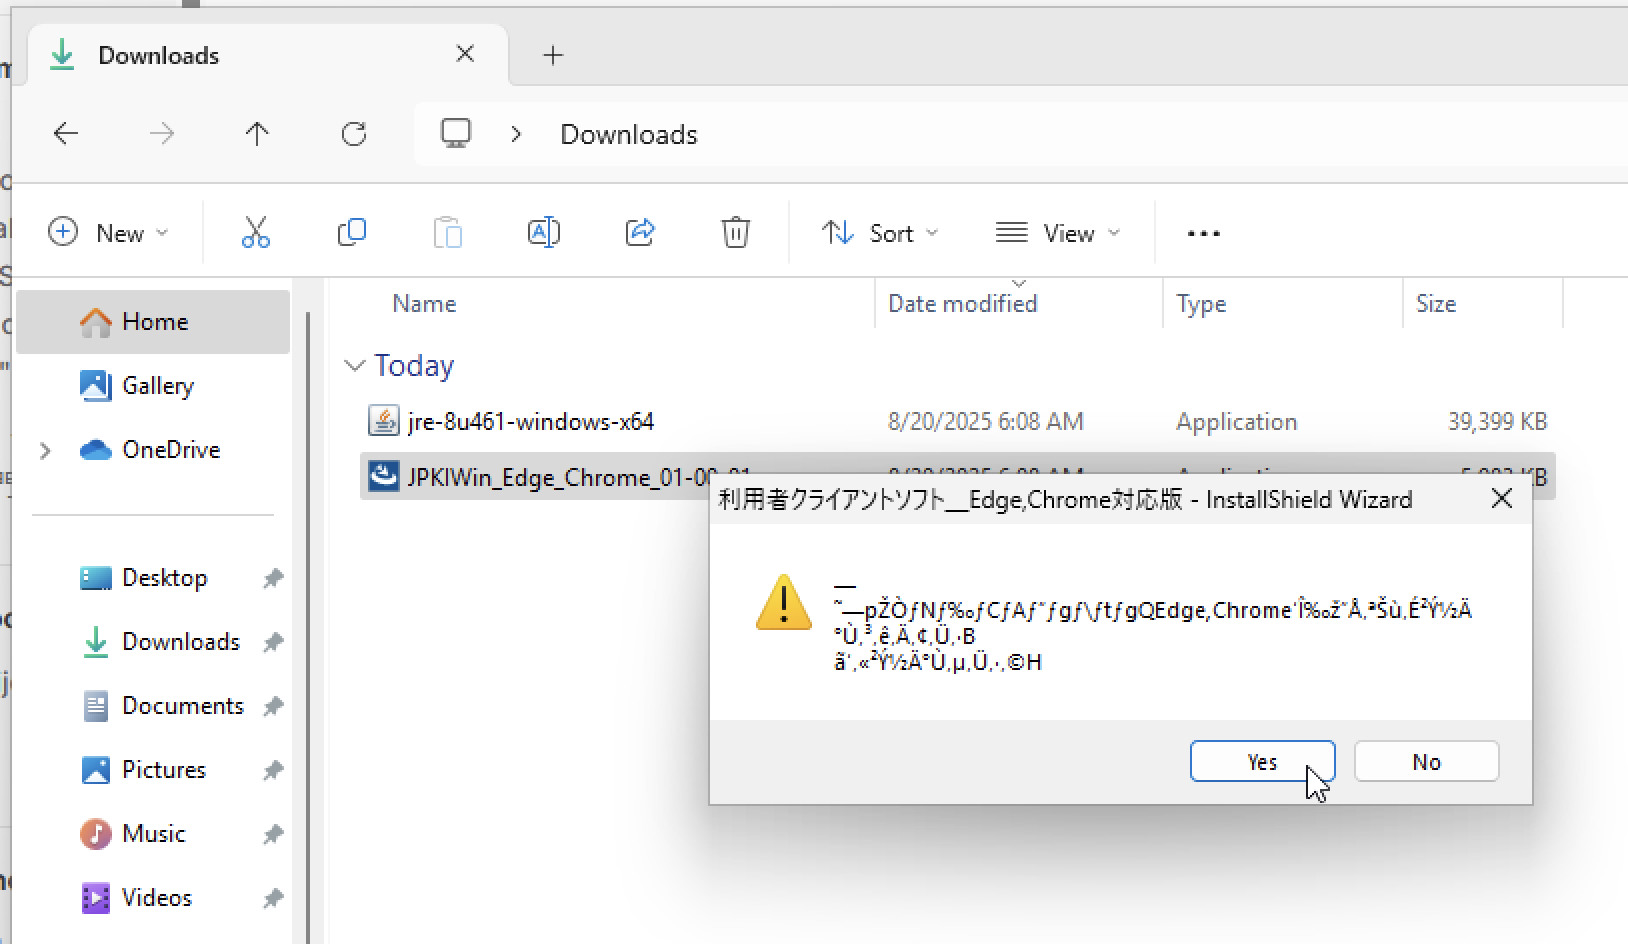
Cause: JPKI app uses non-Unicode characters and the Windows's Language for non-Unicode programs is not set to Japanese. (Like even Japanese people may not have configured this setting...)
Solution: Follow the instructions in Change Language and Region settings to Japanese section above.
EW000J0200 error from JPKI利用者ソフト
You may get the following error when running the JPKI利用者ソフト:
利用者クライアントソフトエラー
...
エラーコード:EW000J0200
English translation:
User Client Software Error
...
Error code: EW000J0200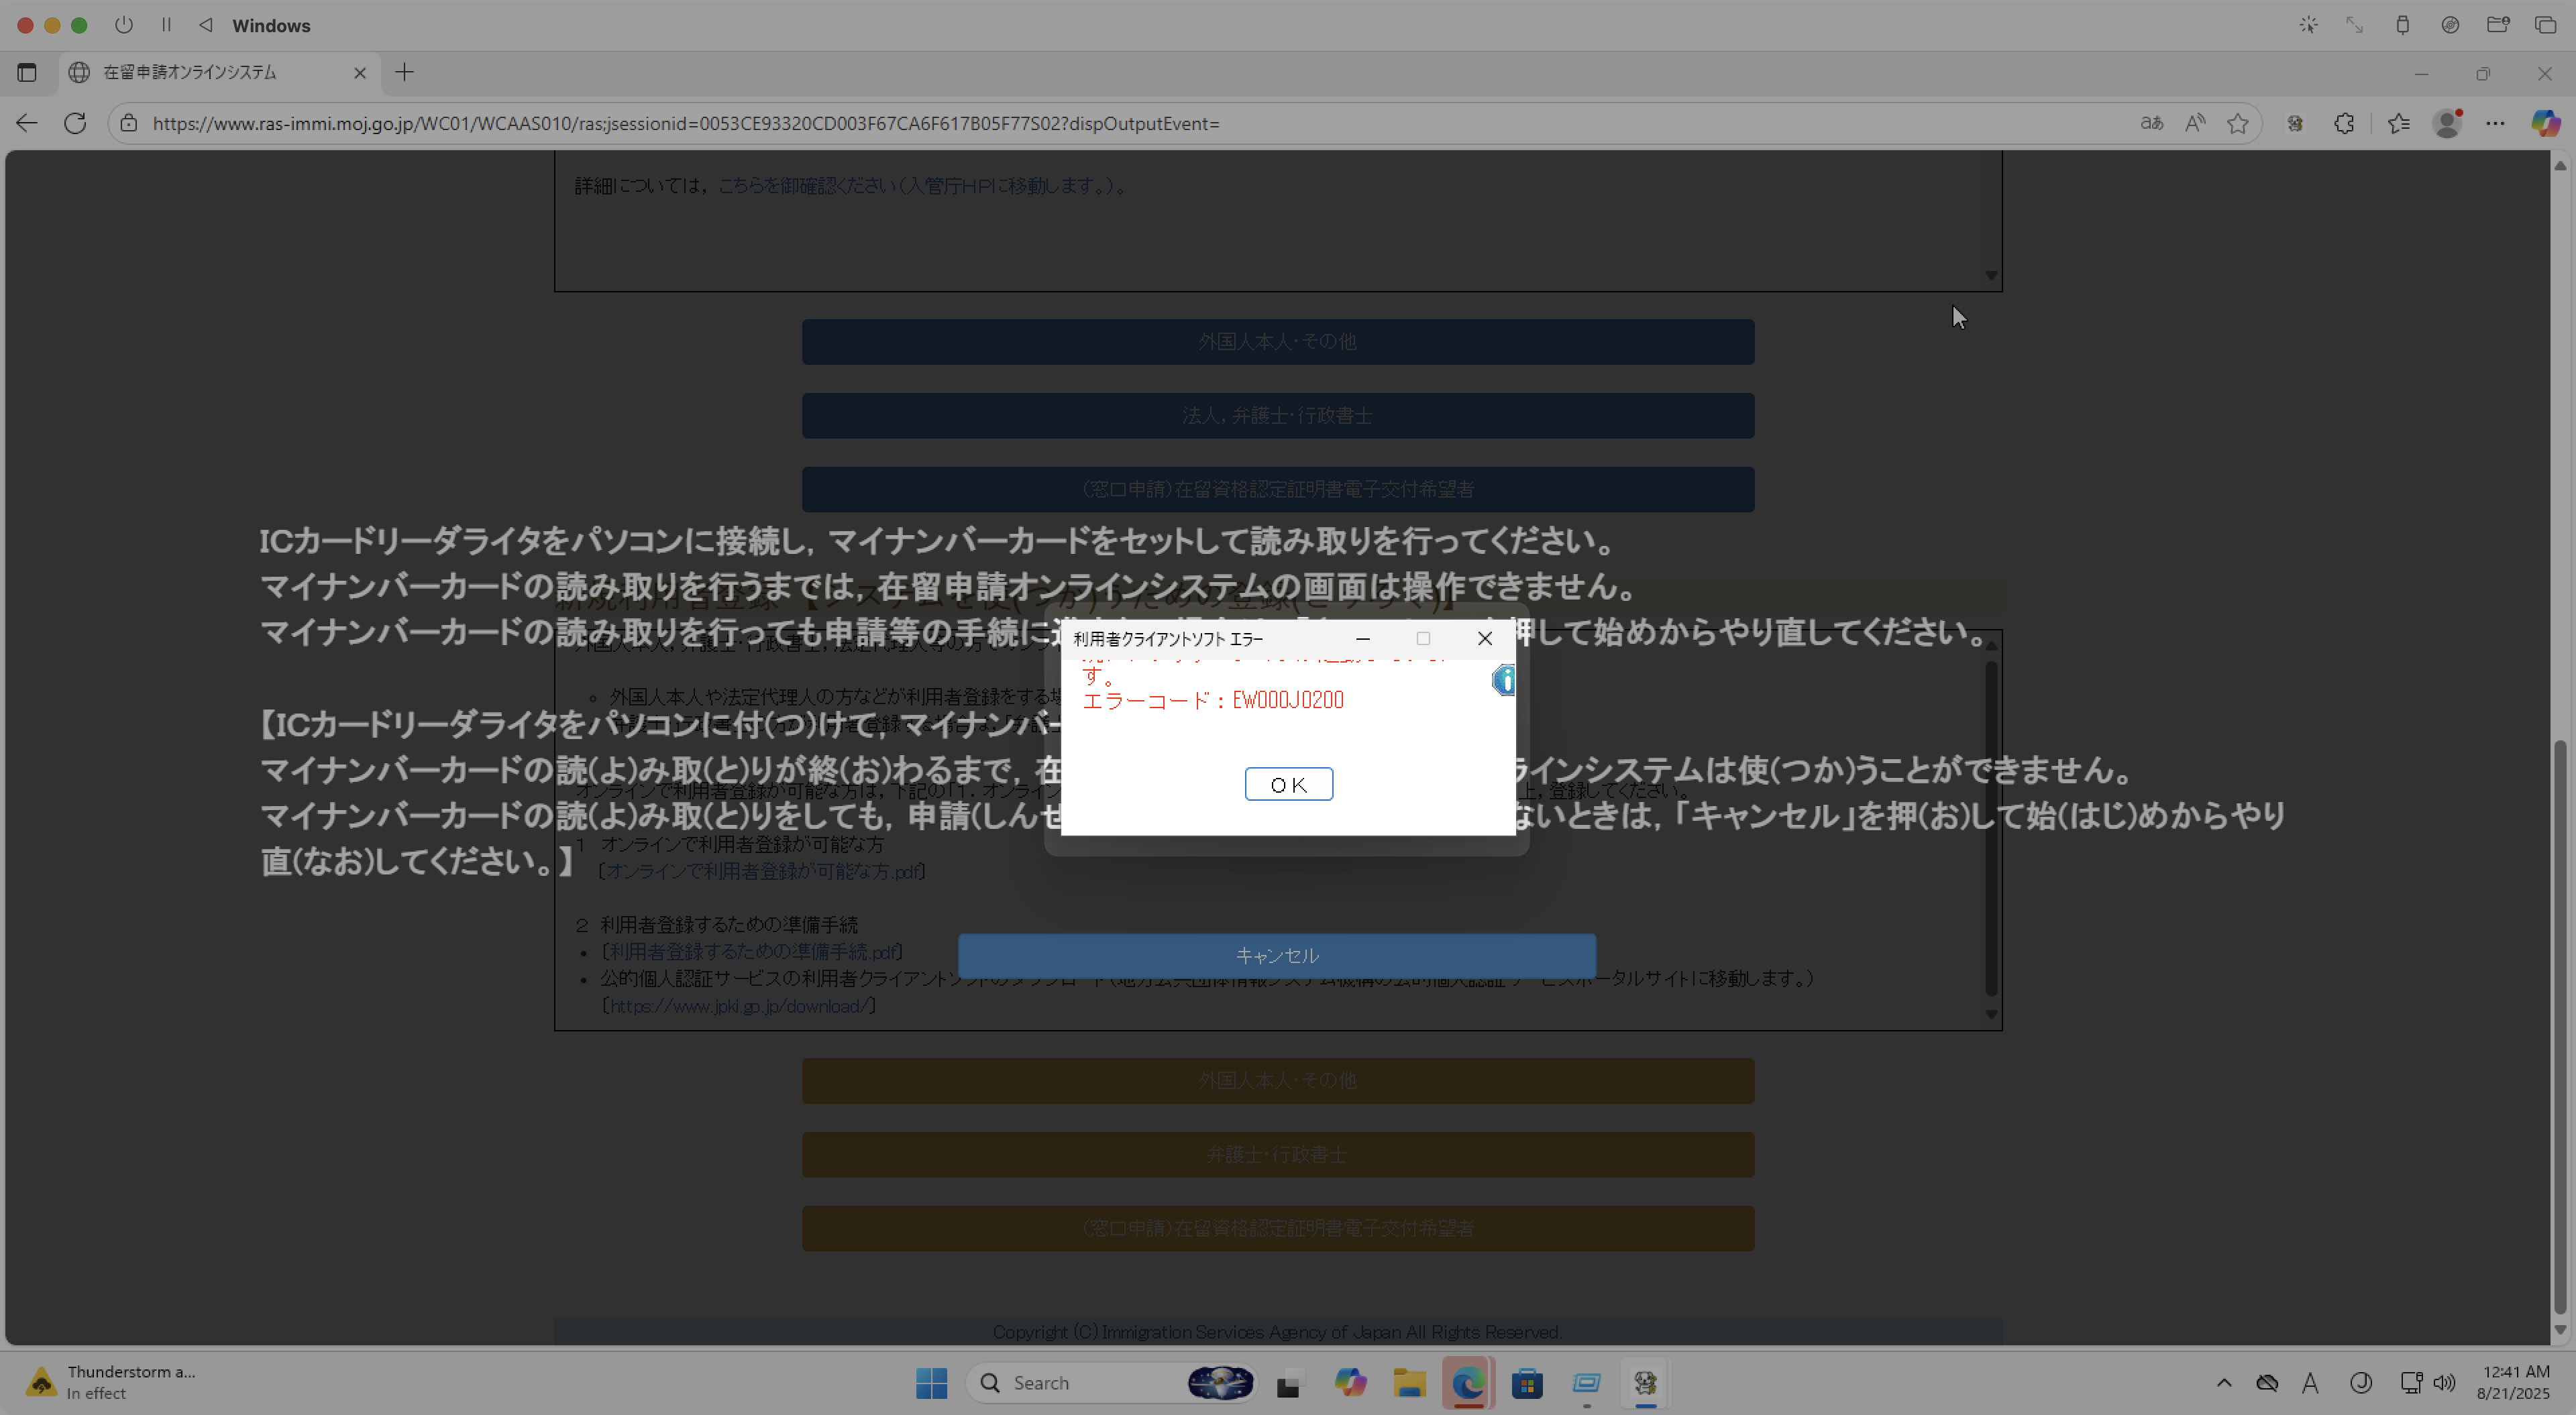
Possible causes:
- The MyNumber Card reader is not connected to your Windows VM - either by not connecting to your Mac or not passing the USB device to the VM.
- The MyNumber Card is not inserted properly into the IC card reader.
- The JPKI app is not installed correctly or not running as administrator.
Solution:
- Ensure that your MyNumber Card is inserted properly into the IC card reader. (Chip contacting the reader)
- Ensure that the IC card reader is connected to your Mac - unplug & replug it.
- Ensure that the IC card reader is passed through to the Windows VM - restart the UTM or Parallels Desktop apps and check the VM settings.
- Ensure that the JPKI app is installed correctly and running as administrator.
EW104J1502 error from JPKI利用者ソフト
You may get the following error when running the JPKI利用者ソフト:
利用者クライアントソフトエラー

カードとの通信中にエラーが発生しました。
エラーコード: EW104J1502
エラー詳細:0x00000006
English translation:
User Client Software Error

An error occurred while communicating with the card.
Error code: EW104J1502
Error details: 0x00000006
Possible causes:
- The MyNumber Card is not inserted properly into the IC card reader. (Chip contacting the reader)
- The IC card reader is not connected to your Mac - unplug & replug it.
- The IC card reader is not passed through to the Windows VM - restart the UTM or Parallels Desktop apps and check the VM settings.
- If the issue persists, try reinserting the card reader or manually downloading the driver, as explained in the following section.