Overview
コンテンツの目的
SC本部メンバーが。。。
- Git と GitHub について理解できた
- GitHub でコードを管理できるようになった
概要
Gitの基本

GitHubの基本

ハンズオン
- Gitをインストールする
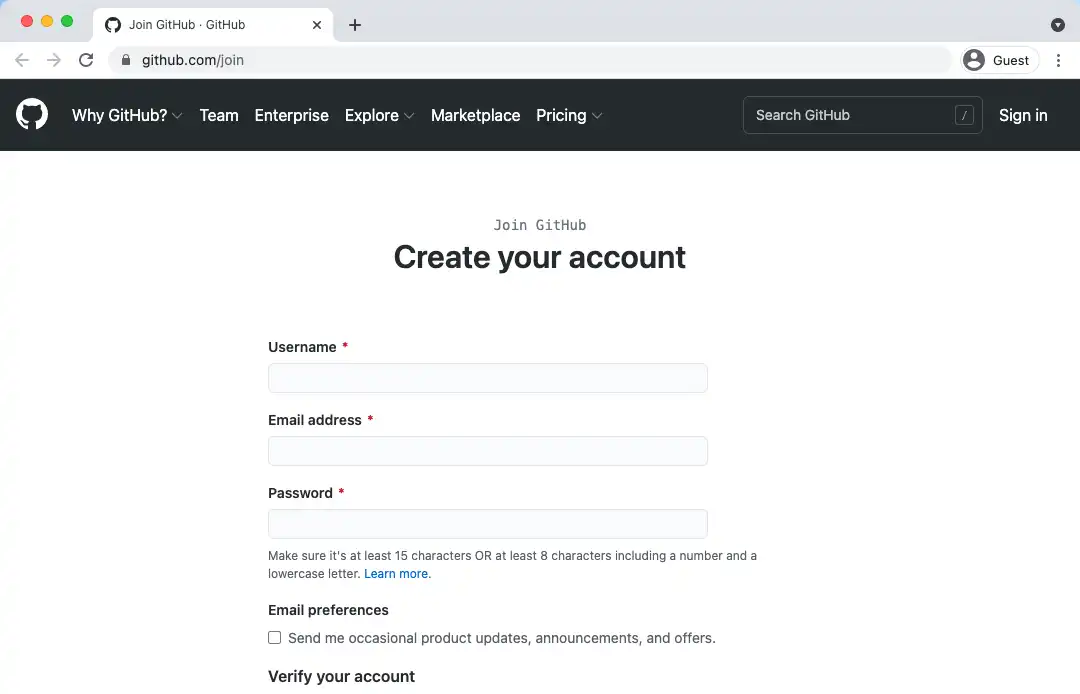
- GitHubアカウントを作成する
- リポジトリを作成する
コマンドラインの個人アクセストークン
パーソナルアクセストークンを生成する
- Settings > Developer settings > Personal access tokens
- github.com/settings/tokens/new
このtokenはターミナル経由でGitHubアカウントにアクセスする時に使用します
- Passwordの代わりにトークンを使用します
- ユースケースごとにtokenを生成します
GitHubの検証のためのtokenを作って保存してください。
GitHub Docs: 個人アクセストークンを使用する
Visual Studio Code + Command Line
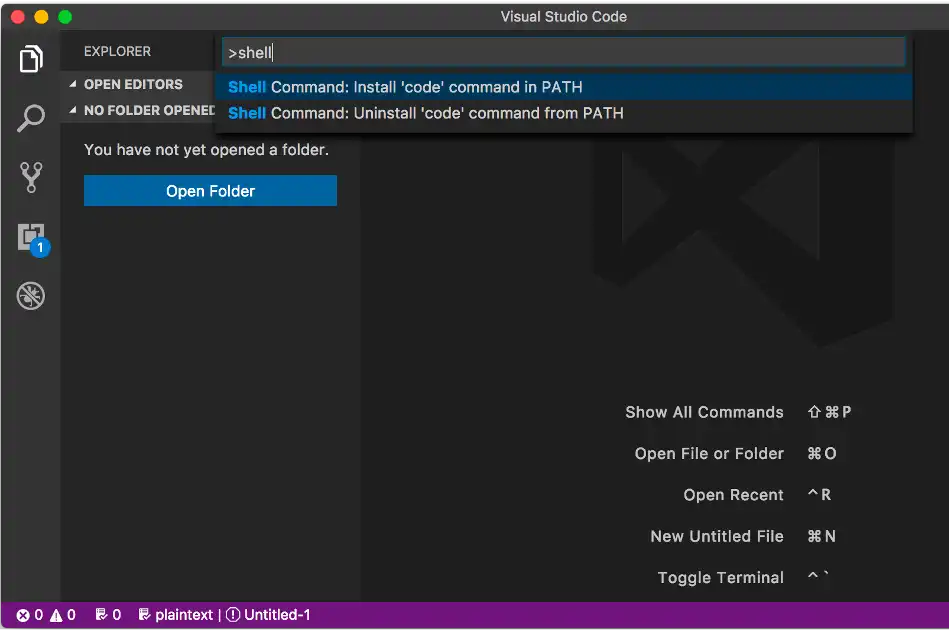
コマンドラインからVSコードを実行する
- VS Codeを開く
- Command Paletteを開く
Command+Shift+P- Shellと入力して& Shell Command:
Install code in PATHを選択する - Terminalを再起動する
code .と入力することでVSCodeが開きます
Visual Studio Code Download Link: code.visualstudio.com
Windows 10 - Gitのインストール
#3 Gitを構成する
#1 Linux用のWindowsサブシステム (WSL) をインストールする
#2 WSLを構成する
Ubuntu 18.04 LTS
git clone git@github.com:user / a.git
WSLに必要な環境
- Start button
- Settings
- Update & Security
- Windows Update
- 必ずWindows OSを更新してください
- Windows 10 Version1709 (OS build16299) 以降である必要があります。

インストール Windows Subsystem for Linux (WSL)
dism.exe /online /enable-feature / featurename:Microsoft-Windows-Subsystem-Linux /all / norestart
- 「Linux用Windowsサブシステム」オプション機能を有効にする
- 管理者としてPowerShellを開き、コマンドを実行します
- Open PowerShell as Administrator
- プロンプトが表示されたらコンピュータを再起動します。
- https://docs.microsoft.com/ja-jp/windows/wsl/install-win10
dism.exe /online /enable-feature / featurename:Microsoft-Windows-Subsystem-Linux /all / norestart
両方のコードブロックは同じです。小さなものは、コピー&ペーストのためです。

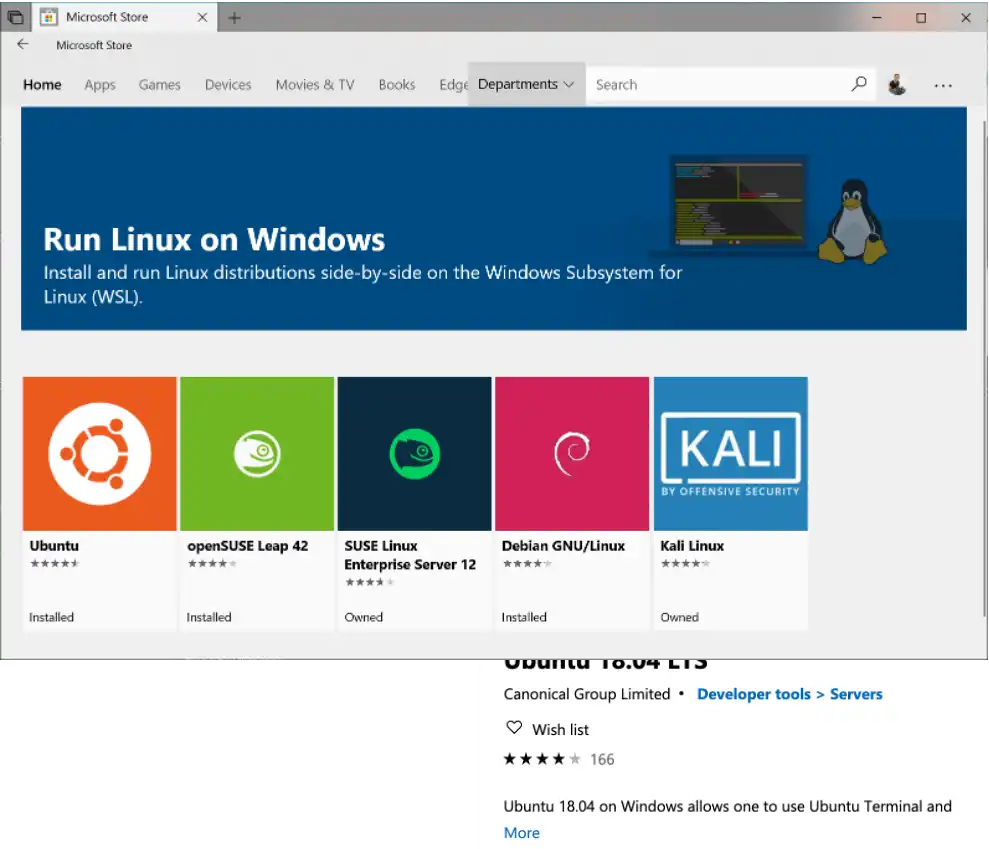
- 選択したLinuxディストリビューションをインストールする
- Microsoft Storeからダウンロードしてインストールします (以下を参照)
- Ubuntu 18.04 LTS
- microsoft.com/store/apps/9N9TNGVNDL3Q
https://docs.microsoft.com/ja-jp/windows/wsl/install-win10
WSLの初期化
, this may take a few minutes...
Please create a default UNIX user account. The username does not need to match your Windows username.
For more information visit: https://aka.ms/wslusers

Enter new UNIX username: panda
Enter new UNIX password:
Retype new UNIX password:

passwd: password updated successfully
Installation successful!
To run a command as administrator (user "root"), use "sudo <command>".
See "man sudo_root" for details.
- ディストリビューションを起動します (Ubuntu 18.04)
- Microsoft Storeアプリの launch ボタンをクリックします
- 新しいLinuxユーザーアカウントの設定
- このユーザーアカウントはWindowsユーザー名に影響しません
- sudoコマンドを実行するときにこの設定されたパスワードが必要です
Gitをインストールする
- ディストリビューションのパッケージを更新してアップグレードする
- 「続行しますか?[Y / n]」と尋ねられたら、Yを入力します。
- gitをインストールする
sudo apt update && sudo apt upgrade
sudo apt install git
WSLを構成する
- wslgitリポジトリをダウンロードする
- wslgitはgitのすべてのリクエストをWSLに転送するツール
- wslgitフォルダー内に移動
- wslgit.shファイルを/usr/binのWSL実行可能ファイルの場所に移動します
- ホームフォルダーに戻る
$ git clone https:// github.com / hangxingliu / wslgit
$ cd wslgit /
$ sudo mv wslgit.sh / usr /bin/ wslgit.sh
$ cd
WSL - VS Code
- Remote -WSL VS Code Extensionをダウンロード
- VSコード設定に移動して、
git.pathオブジェクトを変更します。 - WindowsUSER と UbuntuUSER を独自のものに置き換えます。
{
    "git.path": "C:\Users\WindowsUSER\AppData\Local\Packages\CanonicalGroupLimited.Ubuntu18.04onWindows_79rhkp1fndgsc\LocalState\rootfs\home\UbuntuUSER\wslgit\git.bat"
}
Ubuntuの日本語版
sudo apt -y install language-pack-ja
sudo update-locale LANG=ja_JP.UTF8
sudo apt -y install manpages -ja manpages -ja-dev
- 日本語パックをインストールする
- 現地の言語を日本語に設定する
- Ubuntuを再起動します
- 日本語のマニュアルをインストールする
Git + GitHub設定
- タイトルにWindows WSLと入力します.
- 公開キー (public key) を貼り付けます
Add SSH keyボタン
- $ ssh -keygen
- Generating public/private rsa key pair.
- Enter file in which to save the key (/home/user/. ssh / id_rsa ):
- Created directory '/home/user/. ssh '.
- Enter passphrase (empty for no passphrase):
- Enter same passphrase again:
- Your identification has been saved in /home/user/. ssh / id_rsa .
- Your public key has been saved in /home/user/. ssh / id_rsa.pub .
- …
SSHキーを生成する
GitHubとのリンクが必要です
質問は空白のままにして、そのまま入力してください
キーをクリップボードにコピーします
これは、GitHub.comの設定ページに貼り付ける必要があります。
cat ~/. ssh / id_rsa.pub | clip.exe
GitHub.com/settings
SSH and GPG Keys
New SSH key ボタン
タイトルにWindows WSLと入力します.
公開キー(public key)を貼り付けます
Add SSH key ボタン
設定を確認
次のコマンドで設定を確認します
$ ssh -T git@github.com
The authenticity of host 'github.com (13.114.40.48)' can't be established.
RSA key fingerprint is SHA256:xxx.
Are you sure you want to continue connecting (yes/no)? yes
Warning: Permanently added 'github.com,13.114.40.48' (RSA) to the list of known hosts.
Hi ahandsel! You've successfully authenticated, but GitHub does not provide shell access.
VS Code + Explorer
現在のLinuxフォルダーからエクスプローラーを開くには、次のように入力します。
explorer.exe .
現在のLinuxフォルダーからVS Codeを開くには、次のように入力します。
- エラーがある場合は、UbuntuとVSコードを再起動してください
code .
詳細: Windows 10 に WSL をインストールする | Microsoft Docs
Windows + WLS と GitHub
HTTPSを使用する代わりに --> SSHを使用
git clone https://github.com/.../a.gitgit clone git@github.com:.../a.git
Gitの設定をする
- git config コマンドを使用して、Gitのユーザー名とメールを設定します。
- GitHub_UserName と example@email.com 以下を自分のものに置き換えてください
- Mac : Terminalを使用
- Windows : Ubuntuを使用
$ git config --global user.name "GitHub_UserName"
$ git config --global user.email "example@email.com"
$ git config --global color.ui auto
$ git config --global --list
詳細: Git - 最初のGitの構成